Support for Ubuntu 7.10 ended in April 2009 and the incremental upgrade method is only available from one release to another. There are two options I can think of however. The first would be to upgrade to Ubuntu 8.04 LTS and then upgrade to Ubuntu 10.04 LTS (still in development)
Here are the steps for using this method. First you would need to replace all the default Ubuntu 7.10 repositories
Open a Terminal and submit the following command
sudo gedit /etc/apt/sources.list
Delete all the default Ubuntu 7.10 (gutsy) repositories and replace them with these
deb http://old-releases.ubuntu.com/ubuntu/ gutsy main restricted
deb-src http://old-releases.ubuntu.com/ubuntu/ gutsy main restricted
deb http://old-releases.ubuntu.com/ubuntu/ gutsy-updates main restricted
deb-src http://old-releases.ubuntu.com/ubuntu/ gutsy-updates main restricted
deb http://old-releases.ubuntu.com/ubuntu/ gutsy universe
deb-src http://old-releases.ubuntu.com/ubuntu/ gutsy universe
deb http://old-releases.ubuntu.com/ubuntu/ gutsy-updates universe
deb-src http://old-releases.ubuntu.com/ubuntu/ gutsy-updates universe
deb http://old-releases.ubuntu.com/ubuntu/ gutsy multiverse
deb-src http://old-releases.ubuntu.com/ubuntu/ gutsy multiverse
deb http://old-releases.ubuntu.com/ubuntu/ gutsy-updates multiverse
deb-src http://old-releases.ubuntu.com/ubuntu/ gutsy-updates multiverse
After you have done this click save in the top left hand corner and close the window.
Back in the Terminal submit
sudo apt-get update
This will add the repositories to the Ubuntu 7.10 installation. Open the Update Manager and apply any updates that are suggested. DO NOT select upgrade to Ubuntu 8.04 LTS if you get a notification at this stage
Once you have applied updates Reboot your PC/Laptop then open Update Manager again
You will be notified that a (New Distribution Release 8.04) is available
https://help.ubuntu.com/community/HardyU…
Go ahead and select that. The system upgrader with a Broadband connection usually takes around half an hour I have found through experience
Once Ubuntu 8.04 LTS is fully installed Reboot after which it is time to upgrade from Ubuntu 8.04 LTS to Ubuntu 10.04 LTS
Press Alt-F2 then type update-manager --devel-release
This command will open the Update Manager
Check for new updates. Once you have applied updates Reboot then open Update Manager again
As before you will be notified that a (New Distribution Release 10.04) is available. Go ahead and run the upgrader once again.
The whole process should take around 1-2 hours with a Broadband connection
Ubuntu 10.04 LTS (Lucid Lynx) User Guide
http://ubuntuguide.org/wiki/Ubuntu:Lucid
Alternatively you have the option to directly replace Ubuntu 7.10 with Ubuntu 9.10 which will mean erasing the Ubuntu partition
Ubuntu 9.10 Download
http://www.ubuntu.com/getubuntu/download
The Perfect Desktop - Ubuntu 9.10 (Karmic Koala)
http://www.howtoforge.com/the-perfect-de…
Ubuntu 9.10 (Karmic Koala) User Guide
http://ubuntuguide.org/wiki/Ubuntu:Karmi…
Using either method backup your data before starting
Friday, June 4, 2010
Saturday, January 30, 2010
Citrix Edgesight 5 quick installation Windows 2003
Here is a short video of my experience to install Citrix Edgesight tool. This is a very simple way to install Citrix Edegesight 5.01 on a Windows 2003 server.
What you need to set up before is IIS role install on the server and a SQL database/SQl Express.
Sunday, January 3, 2010
Install XenDesktop on Windows 2003
What if you have to install XenDesktop in a short duration to check it's usability or for testing a software on Citrix XenDesktop platform or to give a proof of concept to management. Citrix XenDesktop could be an important factor in saving costs for the company and can bring efficiency to your current IT infrastructure management if used intelligently.
There are not many documents that can succintly describe in layman's language how to install Citrix XenDesktop. Below are the steps I followed to install Citrix XenDesktop 3.0 . Hope this would be useful.
Step 1: Install Xen Server
- Download Xen Server software from Citrix website. Xen Server is an open source software based on linux.
- This server cannot be installed on a VMWare virtual workstation because VMWare virtual worstation does not support host OS virtualization enabling feature in the bios. Hence it can be installed only on a standalone machine.
- It can only be installed on a 64 bit machine.
- Make sure to enable virtualization in bios of the system where you are installing Xen Server.
- It is a linux based server.
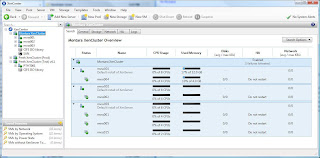
- On completing the installation on the command line of Xen Server type cat /proc/cpuinfo to see if "vmx" key word is present under processors. This indicates virtualization is enabled.
- This Server will host the vitual machines whose desktops will be retrived by users at run time.
- Try this link if you get stuck in the steps above http://www.citrix.com/tv/#videos/104
Step 2: Install Xen Center
 - Xen Center is a tool to connect to the Xen Server. It's latest version is 5.5, it is free to download.
- It can create VMs to reside on the Xen Server.
- If virtualization is not enabled in the Xen Server bios, this returns an error "HVM operation not found" when we try to create a new VM.
Step 3: Install Windows XP or Windows 7 VM on the Xen Server
- Open the Xen Center, select "New VM" option in the tools menu,
- Insert CD of the OS to be installed on the VM.
- Select the "Console" option to check progress of installation.
- Then install OS(XP or Windows7).
- Install the XenDesktop Virtual Desktop Agent
- Re-sizing a partition is a painful process, better assign large amounts of hard disk space initially.
- If the network does not connect go to Network tab in the VM and add network interface.
- Remember to install the Virtual Desktop Agent on the desktop virtual machine.
Step 4: Install Desktop Delivery Controller
 - This module at run time re-configures the Virtual Machine Desktops to be trasmitted to the endpoints. In short it is responsible to connect Desktop to VMs.
- Remember to assign lot of memory(atleast 768 MB and lot of disk space atleast 30GB), else the installation for DDC will fail.
- Remember to provide a static ip address.
- The VM name where this component is installed is xen-desktop1 ping to see if it is alive, else turn it on from the Xen-Center host.
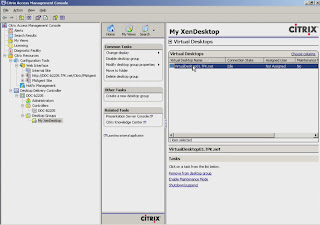
- Open the management console and assign users to VM's. Using this login the users can log into the VM's through a remote Citrix Xendesktop client. The image above depicts the Management console.
Step 6: Install Desktop receiver
- This is the software to be installed on the desktops which want to connect to the VMs on The Xen-Server. Just search for Citrix XenDesktop client and install the same.
- This client will be installed on the Endpoint where the VM from Xen Server will be streamed. You can create logins on the Desktop Delivery Controller and use these logins to log through the Xen Desktop client.
There are not many documents that can succintly describe in layman's language how to install Citrix XenDesktop. Below are the steps I followed to install Citrix XenDesktop 3.0 . Hope this would be useful.
Step 1: Install Xen Server
- Download Xen Server software from Citrix website. Xen Server is an open source software based on linux.
- This server cannot be installed on a VMWare virtual workstation because VMWare virtual worstation does not support host OS virtualization enabling feature in the bios. Hence it can be installed only on a standalone machine.
- It can only be installed on a 64 bit machine.
- Make sure to enable virtualization in bios of the system where you are installing Xen Server.
- It is a linux based server.
- On completing the installation on the command line of Xen Server type cat /proc/cpuinfo to see if "vmx" key word is present under processors. This indicates virtualization is enabled.
- This Server will host the vitual machines whose desktops will be retrived by users at run time.
- Try this link if you get stuck in the steps above http://www.citrix.com/tv/#videos/104
Step 2: Install Xen Center
 - Xen Center is a tool to connect to the Xen Server. It's latest version is 5.5, it is free to download.
- It can create VMs to reside on the Xen Server.
- If virtualization is not enabled in the Xen Server bios, this returns an error "HVM operation not found" when we try to create a new VM.
Step 3: Install Windows XP or Windows 7 VM on the Xen Server
- Open the Xen Center, select "New VM" option in the tools menu,
- Insert CD of the OS to be installed on the VM.
- Select the "Console" option to check progress of installation.
- Then install OS(XP or Windows7).
- Install the XenDesktop Virtual Desktop Agent
- Re-sizing a partition is a painful process, better assign large amounts of hard disk space initially.
- If the network does not connect go to Network tab in the VM and add network interface.
- Remember to install the Virtual Desktop Agent on the desktop virtual machine.
Step 4: Install Desktop Delivery Controller
 - This module at run time re-configures the Virtual Machine Desktops to be trasmitted to the endpoints. In short it is responsible to connect Desktop to VMs.
- Remember to assign lot of memory(atleast 768 MB and lot of disk space atleast 30GB), else the installation for DDC will fail.
- Remember to provide a static ip address.
- The VM name where this component is installed is xen-desktop1 ping to see if it is alive, else turn it on from the Xen-Center host.
- Open the management console and assign users to VM's. Using this login the users can log into the VM's through a remote Citrix Xendesktop client. The image above depicts the Management console.
Step 6: Install Desktop receiver
- This is the software to be installed on the desktops which want to connect to the VMs on The Xen-Server. Just search for Citrix XenDesktop client and install the same.
- This client will be installed on the Endpoint where the VM from Xen Server will be streamed. You can create logins on the Desktop Delivery Controller and use these logins to log through the Xen Desktop client.

What is Citrix??? Do I need to know?
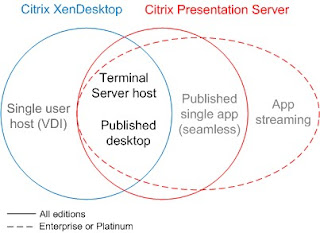
Citrix has a Virtualization environment, which can virtualize applications(Xenapp) and Desktops(XenDesktop).
In the Citrix virtualization solution all applications run on the server and the endpoints view the window for this application running on the server. Think about this as streaming live video from the Citrix Server (where the application runs) to the endpoint (where the user "views" the running application through this streaming video concept.
The user is also allowed to interact with the application. For example, using our concept of streaming video, clicking on a specific portion of this streaming video causes the Citrix Endpoint Client to send the click to the server (where the application is running). The client sends the X and Y location of the click. When the server receives the click coordinates, it generates a click within the application on that X and Y coordinate. This will invoke the appropriate action on the server and the user will instantly see the change because constantly streaming the video content of this application.
The same happens for keyboard input as well. When the user presses a key on the keyboard, the key scan code is send to the server. The server presses that key in the running application which shows up in the server and in turn is displayed to the users on the endpoint.
In the Citrix virtualization environment the applications/Desktops are streamed/accessed from the a centralized server.
The centralized server is easy to maintain, apply patches, efficiently use hardware etc.
Subscribe to:
Posts (Atom)